
Why Your Air Purifier Filter Smells Bad After Washing
Air purifier filter maintenance has gotten complicated with all the conflicting advice flying around. Wash it, don’t wash it, use warm water, use cold — everyone has a different take. As someone who ruined a $200 bedroom purifier by doing exactly the wrong thing, I learned everything there is to know about why filters smell after washing. Today, I will share it all with you.
The short version: I rinsed my Levoit Core 300 filter under the bathroom sink, shook it out maybe five times, and stuffed it back in while it was still obviously damp. For the next week, my bedroom smelled like a wet dog had moved into the walls. Probably should have opened with this section, honestly — but you need the full picture first.
Why Washing Makes the Smell Worse
Three things collide at once: trapped moisture, mold spores, and bacteria that absolutely love damp, dark spaces.
Air purifier filters are built to trap particles — dust, pet dander, pollen, all of it lodges inside the filter media. That media is porous. Absorbent. When you introduce water into something packed with organic debris, you’re not cleaning it so much as marinating it. The filter dries slowly. Meanwhile, inside, in the dark, things grow.
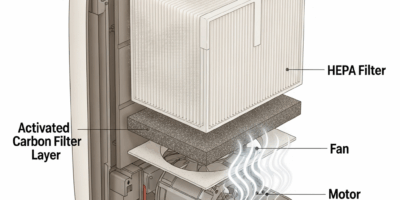
But what is a “non-washable” filter, exactly? In essence, it’s a filter built from materials that water physically destroys. But it’s much more than that. True HEPA filters — the real ones, not “HEPA-type” marketing language — use glass fiber mesh so fine and fragile that water causes the fibers to clump, warp, and collapse. You’re not just adding moisture. You’re dismantling the structure itself. Damaged media accelerates bacterial growth. Worse airflow. Worse odor. A ruined filter.
Carbon pre-filters, those flat foam or mesh outer layers, are often washable. The HEPA layer underneath? Almost never. When a non-washable HEPA filter gets wet, the fibers mat together, create stagnant pockets, and essentially become a petri dish you’re pumping air through. That’s the smell.
Drying time is the other killer. A filter needs 24 to 48 hours minimum — in moving air or direct sunlight — to dry completely. Most people give it four hours and call it done. The inside is still damp. The bacteria don’t care that the surface feels dry.
Is Your Filter Actually Washable
Check the filter packaging or the label printed directly on the media. Look for the words “washable,” “permanent,” or “reusable.” See “disposable” or “replacement only”? There’s your answer. Put it down. Step away from the sink.
Your purifier manual is the most reliable source — at least if you still have it. Brands like Levoit, Coway, and Dyson clearly label which layers handle water and which ones don’t. Most purifiers use a multi-layer design:
- Pre-filter (usually outer foam layer) — often washable
- Carbon layer (black mesh or granules) — sometimes washable, sometimes not
- HEPA layer (dense white or pink fibers) — almost never washable
Even when the package says “washable,” that usually means the pre-filter only. The HEPA core is sacred. Don’t touch it with water. I’m apparently someone who has to learn this the hard way, and the Levoit method works for me now while rinsing the whole thing together never actually helped anything.
When a non-washable filter gets soaked, here’s the sequence: water damages fiber integrity, airflow drops immediately, moisture gets trapped deep in the media, bacteria and mold move in, and the smell becomes permanent. You cannot fix this. The filter needs replacement. A replacement HEPA filter for most common models runs $20 to $45. Dyson filters are $60 to $80. Expensive, but cheaper than buying a whole new unit because you tried to save $30.
How to Fix a Filter That Smells After Washing
If your filter is actually washable and just wasn’t dried properly, this is fixable. Don’t make my mistake of assuming the problem goes away on its own.
Step 1: Rinse it again. Clean running water, room temperature. Let it flow through the media — you’re flushing out trapped debris and residue. Don’t scrub. Don’t squeeze. Just let the water do the work.
Step 2: Shake out excess moisture. Hold it vertical, shake it firmly 10 to 15 times. You want water actively dripping out, not sitting in pockets inside the media.
Step 3: Dry it completely. This is where everything either goes right or wrong. Stand the filter vertically — on its edge — somewhere with real airflow. A sunny windowsill, a room with a box fan running, next to an open window. The minimum is 24 hours. I use 48 as my personal rule, no exceptions. That’s what actually works.
No hairdryers. No heat guns. Definitely not the oven — I’ve seen that suggestion online and it’s genuinely terrible advice. Heat melts the adhesive holding the filter layers together. Air drying only. Always.
Step 4: Smell-check before reinstalling. If the odor is gone, you’re good. If anything still smells off after 48 hours of proper drying, the filter is contaminated beyond what drying can fix. Replace it.
When You Need to Replace the Filter Instead
If your filter is non-washable and you already washed it — replace it. Full stop. There’s no recovery process here. The fiber damage is done.
If you’ve done the full drying protocol and the smell is still there after 48 hours, replace it. Mold and bacterial colonies have established themselves inside the media. Drying slows them down — it doesn’t kill them. That smell will come back, and it’ll come back worse.
The decision is actually pretty simple. Does it still smell? Is it a non-washable filter you washed? Is it a washable filter that’s been through the full drying process and still reeks? New filter. Done.
Most manufacturers recommend replacing filters every 6 to 12 months depending on how hard the unit runs. A Levoit replacement filter is around $25. Coway runs $35 to $50. Budget it the same way you budget for furnace filters — it’s maintenance, not an emergency expense.
How to Prevent the Smell Next Time
So, without further ado, let’s dive into the actual prevention. It starts before you ever touch the filter.
Always verify washability before any water contact. Check the manual, then the label on the filter itself. That’s five seconds of reading that saves a $40 replacement. While you won’t need any special equipment for this, you will need a handful of basics: the manual, decent airflow for drying, and 48 hours of patience.
For non-washable filters, vacuum them instead. A handheld vacuum or brush attachment pulls surface dust off without introducing any moisture. It extends filter life and keeps things fresher between replacements — at least if you do it every few weeks rather than waiting until the filter looks visibly gray.
Vertical positioning might be the best option for drying, as washable filters require complete airflow through the media. That is because flat surfaces trap moisture underneath, and the center of the filter never fully dries. Stand it up. Moving air. 48 hours. That’s the whole protocol.
Stick to the replacement schedule in your manual. Don’t stretch a 12-month filter to 18 months because it “still looks fine.” An overworked, degraded filter breeds smell. A fresh one doesn’t. Keep a spare in the closet — a single backup filter means you’ll never be tempted to quickly rinse something that shouldn’t be rinsed. You’ll just swap it out. That’s what makes proper filter rotation so endearing to us air quality obsessives who’ve already learned these lessons the expensive way.
The smell after washing isn’t entirely your fault. The design of air filters makes them genuinely smell-prone when wet. But now you know exactly why it happens, how to fix it when it does, and how to make sure it never happens again.


Stay in the loop
Get the latest northwestcleanair.com updates delivered to your inbox.