Corsi-Rosenthal Box — DIY Air Purifier That Works
DIY air purification has gotten complicated with all the misinformation flying around. As someone who watched Seattle’s sky turn that specific shade of apocalyptic orange in August 2020 — while stuffing wet towels under my apartment door like that was going to accomplish anything — I learned everything there is to know about the Corsi-Rosenthal box. It’s a DIY air purifier you slap together in roughly fifteen minutes using box fans and furnace filters. And it genuinely works. Not “works” the way a eucalyptus candle supposedly “clears the air,” but works in the way that EPA researchers and university labs have actually documented with real data. If you’re anywhere in the Pacific Northwest, where wildfire smoke season now stretches from July through October and sometimes bleeds into November, build one now — before you actually need it.
What It Is and Why It Works
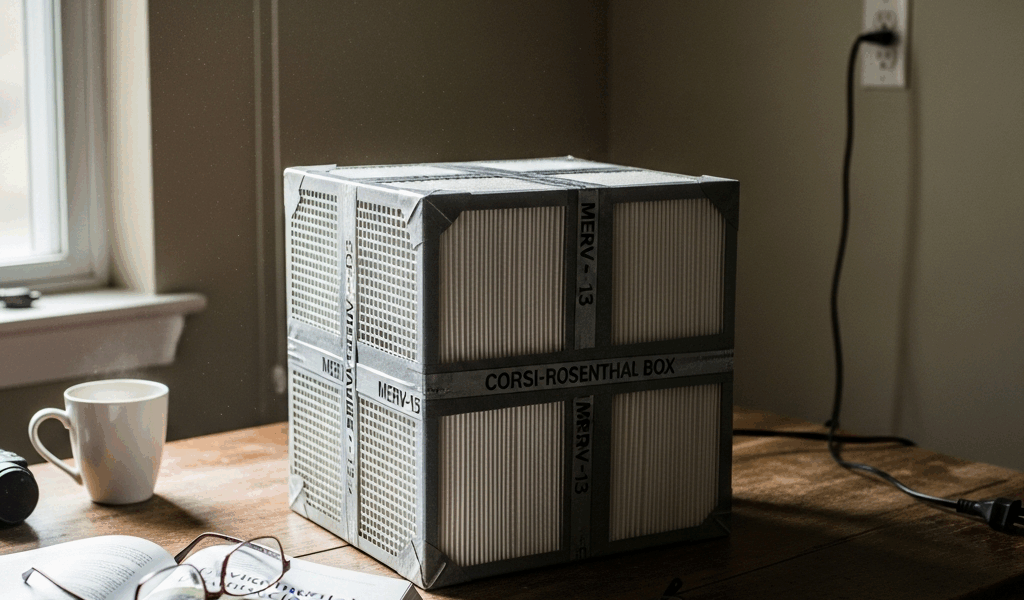
But what is a Corsi-Rosenthal box? In essence, it’s four MERV-13 furnace filters duct-taped into a cube with a box fan strapped to the top. But it’s much more than that.
The design came from two people who landed on the same idea independently. Richard Corsi — an air quality engineer, now dean of engineering at UC Davis — and Jim Rosenthal, a filter manufacturer out of Texas, both arrived at this concept separately during 2020 and eventually connected on Twitter during the early pandemic chaos. Frustrated by the lack of affordable, accessible air cleaning options during COVID, Corsi sketched out the cube design using whatever filter dimensions he had on hand. The idea took off several years later and eventually evolved into the open-source build that enthusiasts know and replicate today.
That four-sided geometry is the whole point, honestly. Pulling air through four filters simultaneously — instead of just one — dramatically increases the total surface area the fan has to work with. Less resistance per filter means more airflow overall. More airflow means more air cleaned per hour. A University of Michigan study found the box performed 261% better than a single-filter setup running the same fan. The EPA tested it. UC Davis tested it. The results held up both times.
MERV-13 specifically matters here. MERV — Minimum Efficiency Reporting Value — is a standardized scale for how well a filter captures particles across different size ranges. MERV-13 catches particles down to 0.3 microns, which covers wildfire smoke, PM2.5, pollen, and most respiratory droplets. MERV-8 filters, which are cheaper and easier to find, don’t cut it for smoke conditions. The number matters. Don’t substitute down.
Fan orientation trips people up. You want the fan sitting on top of the cube blowing air upward — pulling air inward through the filters, exhausting clean air out the top. Flip it the wrong way and you pressurize the inside of the box, forcing air out through the corner gaps instead of through the filter media itself. The fan frame and filter frames both have airflow arrows printed on them. Pay attention to those arrows.
Parts List and Where to Buy in the PNW
Probably should have opened with this section, honestly. Here’s what you actually need.
The standard build uses four 20x20x2 inch MERV-13 filters. That size is the sweet spot — common enough that most hardware stores stock it, and sized correctly for a standard 20-inch box fan. You can technically use 20x20x1 filters and they’ll function, but the 2-inch depth gives you more filter media and longer life before replacement.
- 4x MERV-13 furnace filters, 20x20x2 inches — Home Depot locations on Rainier Ave, Northgate, and Sodo typically stock these. Filtrete 1500 MPR filters in that size run about $8 to $10 each. Nordic Pure is another brand that shows up consistently at those same stores — well-regarded by the researchers who originally tested the design. Budget roughly $35 to $40 for all four.
- 1x 20-inch box fan — Fred Meyer stores across the region (Ballard, Capitol Hill, Burien) carry Lasko and Holmes fans through spring and summer. The Lasko 3733 is a common one, runs around $20 to $25. If smoke season is already underway, check Amazon — brick-and-mortar stock disappears faster than you’d think once air quality alerts start.
- 1 roll of duct tape or foil HVAC tape — You probably already have this somewhere. If not, a couple dollars at any hardware store. HVAC foil tape makes a cleaner seal against the cardboard frames, but regular duct tape from the junk drawer works fine if you’re thorough about it.
Total cost lands between $55 and $70 buying everything new. That’s less than a single replacement filter cartridge for most commercial air purifiers — which, apparently, a lot of people don’t realize until they’re already locked into one. I built my first one for $58 total: filters from the Rainier Ave Home Depot, fan from a Fred Meyer run on a Tuesday afternoon.
One note for people in Tacoma, Olympia, or further south: ACE Hardware locations down there tend to stock Nordic Pure filters more reliably than the big box stores. Call ahead during smoke season. These filters move fast once the air quality index starts climbing past 100.
Step-by-Step Build Instructions
Motivated by the 2022 smoke event that trapped a week’s worth of particulate inside my apartment, I finally built one of these using four Filtrete 1500 MPR filters and a Lasko fan grabbed from the Capitol Hill Fred Meyer on a Wednesday morning. The whole thing took about fifteen minutes — and that includes the time I spent reading the airflow arrows wrong on my first attempt.
- Lay out your four filters flat and find the airflow arrows. Every furnace filter has an arrow printed on the cardboard frame showing which direction air moves through it. You want all four arrows pointing inward — toward the center of the cube you’re building. When air flows through the filters into the box, it needs to be moving in the correct direction through the filter media itself.
- Stand two filters up facing each other to form opposite walls. Hold them in place or lean them against something stable while you work. The arrows on both should point toward each other — toward the center of the space between them.
- Add the remaining two filters to complete the square. Now you have a four-sided open cube — top and bottom both open. Double-check that all four arrows still point inward before you touch the tape.
- Tape all four corner seams where filters meet. This is the step people rush. It’s also the step that matters most. Any gap in those seams is a gap that air will take instead of passing through the filter media. Run tape along the full length of each corner, press it firmly into both filter frames, and add a second layer anywhere the first strip doesn’t lay completely flat. Foil HVAC tape bonds better to cardboard than standard duct tape — but either works if you’re not cutting corners.
- Place the box fan on top, facing upward. The exhaust side — the side that blows air out — faces up, away from the cube. The intake side faces down into the cube interior. This pulls air inward through the filters and exhausts clean air upward into the room.
- Tape the fan to the top of the filter cube. Run tape around the full perimeter where the fan frame meets the filter frames. It doesn’t have to look clean. It has to be airtight — so air doesn’t bypass the filters around the fan’s edges.
- Plug it in, set it in the room you use most, and run it on high for the first hour. You’ll smell the difference faster than you expect. That’s not a figure of speech.
Don’t make my mistake — I got the fan orientation right but didn’t tape the corner seams well enough. Running my hand along the outside of the cube, I could actually feel air seeping out of two corners. Pulled the tape off, did it again properly. Takes maybe two minutes to fix and makes a measurable difference in how much air the unit actually cleans.
How Long Filters Last in Smoke Season
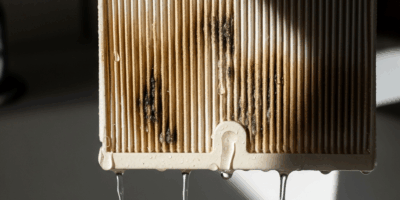
Pacific Northwest smoke season hits these filters differently than what they were designed for. Furnace filters in a normal HVAC system process relatively clean indoor air. Filters in a Corsi-Rosenthal box during an AQI-200 smoke event are working at a completely different level — and the visual evidence accumulates fast.
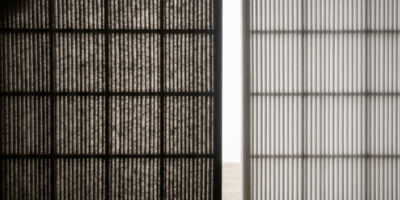
The practical rule is straightforward: replace when visibly dirty. Pull the filters off and look at the side that faced the inside of the cube. If it’s gray or brown with visible particulate buildup, it’s done. During heavy smoke events — the kind where the AQI sits above 150 for days — that can happen in a week of continuous use. Between smoke events, during normal indoor use, monthly replacement is a reasonable baseline.
For PNW context specifically: buy two full sets of filters at the start of summer and keep one in reserve. During the 2020 and 2022 smoke events around Seattle, Home Depot locations sold out of MERV-13 filters within a day or two of the air quality alerts going out. The people who already had spares sitting in a closet didn’t have to drive to four different stores on a smoky Thursday afternoon.
One thing worth knowing — a clogged filter doesn’t fail suddenly or catastrophically. It just reduces airflow gradually as the media loads up, which reduces how much air the unit cleans per hour. You’ll notice the fan seems to be working harder while moving less air. That’s your signal. The unit won’t start blowing dirty air back at you the way a saturated activated carbon filter eventually can. It just loses effectiveness incrementally until you swap the filters out.
Spent filters from a real smoke event are genuinely something to look at. Hold one up to a window and you’ll see exactly what didn’t end up in your lungs. That’s what makes the Corsi-Rosenthal box endearing to us Pacific Northwesterners — it makes the invisible visible, and it costs less than dinner out. Most people who see those gray filters immediately go build a second unit for their bedroom.


Stay in the loop
Get the latest northwestcleanair.com updates delivered to your inbox.